Foolproof Chocolate Ganache Cake: Elegant Dessert Made Easy
Imagine a dessert that looks like it stepped right out of a high-end patisserie, yet is surprisingly simple to create in your own kitchen. That, my friends, is the magic of a chocolate ganache cake. This isn't just any chocolate cake; it's a symphony of rich, moist chocolate sponge crowned with a glossy, velvety smooth ganache that will make any chocolate lover swoon. Whether you're aiming to impress guests, celebrate a special occasion like Valentine's Day, or simply treat yourself to something extraordinary, this foolproof recipe is your ticket to an elegant dessert made easy.
The term "ganache" might sound intimidatingly French, but at its heart, it's a marvel of simplicity – a luscious emulsion of chocolate and cream. And when paired with a tender, flavorful chocolate cake, it transforms into an unforgettable culinary experience. Forget the elaborate frostings and complex techniques; the beauty of a chocolate ganache cake lies in its straightforward steps and stunning, decadent results. Let's embark on this delightful baking journey together!
Crafting the Perfect Chocolate Cake Base
Every magnificent structure needs a strong foundation, and our chocolate ganache cake is no exception. The cake itself must be moist, tender, and deeply chocolatey, providing the ideal canvas for the decadent ganache. Achieving this perfection starts with careful preparation and understanding the role of each ingredient.
- Pan Preparation is Key: Begin by preheating your oven to 325 degrees Fahrenheit (160°C). For an 8-inch round cake pan (a 9-inch pan can also work, though baking time might vary slightly), butter and flour it thoroughly. Don't skip lining the bottom with parchment paper – this crucial step ensures your beautiful cake releases effortlessly, preventing any heartbreak after all your hard work.
- The Art of Creaming: In the bowl of an electric mixer fitted with the paddle attachment, cream together softened butter and granulated sugar until the mixture is light and fluffy. This isn't just about combining ingredients; it's about incorporating air, which contributes to the cake's tender crumb and structure. Good quality, room-temperature butter makes all the difference here.
- Building Flavor and Moisture: Incorporate eggs one at a time, mixing well after each addition. This allows the eggs to fully emulsify with the butter and sugar, creating a stable batter. Next, stir in chocolate syrup and vanilla extract. These ingredients infuse the cake with a rich, complex chocolate flavor and a hint of aromatic warmth.
- The Flour Factor: Finally, add your all-purpose flour. Mix until *just* combined. This is a critical step where many home bakers go wrong. Overmixing flour develops the gluten excessively, resulting in a tough, chewy cake rather than the desired light and tender crumb. As soon as you see no more streaks of dry flour, stop mixing. For a truly decadent chocolate ganache cake, your dream dessert, the cake base needs to be perfect.
- Baking to Perfection: Pour the batter into your prepared pan and bake for 40 to 45 minutes, or until the center is just set. A toothpick inserted into the center should come out with moist crumbs, but not wet batter. Remember, just like overmixing, overbaking will dry out your cake, robbing it of its luscious texture. Once baked, let it cool thoroughly in the pan before attempting to remove it. Patience is a virtue here!
Mastering the Art of Velvety Ganache
Now for the star of the show: the ganache. This glossy, rich coating is what elevates a simple chocolate cake into a truly elegant dessert. While it sounds fancy, making ganache is surprisingly simple, requiring just a few key ingredients and a gentle touch.
- The Ganache Trio: Your core ingredients for this velvety elixir are heavy cream, chocolate chips (or finely chopped chocolate), and a touch of instant coffee. The instant coffee might seem unusual, but it doesn't make the ganache taste like coffee; instead, it acts as a magical flavor enhancer, intensifying the chocolate notes and adding depth.
- The Gentle Heat Method: The best foolproof way to melt chocolate for ganache is using a double boiler. Place the heavy cream, chocolate chips, and instant coffee in the top of a double boiler set over simmering water. The gentle, indirect heat prevents the chocolate from scorching and helps create a perfectly smooth, glossy emulsion. Stir occasionally until everything is melted, warm, and beautifully smooth. While you *can* microwave cream and chocolate in short intervals, the double boiler method consistently yields a superior, more stable, and shinier ganache. For more expert advice on achieving that perfect shine, check out our guide on Secrets to a Glossy Chocolate Ganache Cake Finish Every Time.
- Understanding the Emulsion: Ganache is essentially an emulsion of fat (from the chocolate and cream) and water. Heating the cream and pouring it over the chocolate allows the fats to combine smoothly. Whisking it gently helps create a stable, glossy mixture. You'll know it's ready when it's utterly smooth and pourable, without any lumps.
Assembling Your Edible Masterpiece: The Glaze and Finish
With your cake cooled and your ganache perfected, it's time for the grand finale – assembling your stunning chocolate ganache cake. This stage requires a bit of setup and a steady hand, but the results are incredibly rewarding.
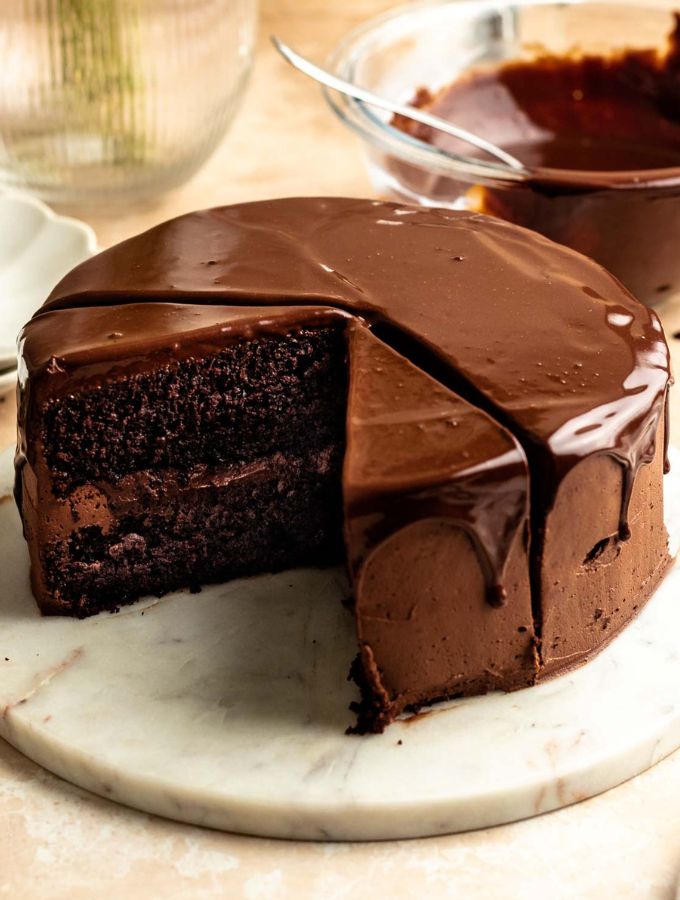
- Crucial Cooling: This step cannot be stressed enough: the cake *must* be completely cooled before pouring the ganache. A warm cake will simply melt the ganache, leading to a runny mess. Patience here ensures structural integrity and a beautiful finish.
- Set Up for Success: Place your thoroughly cooled cake upside down on a wire rack. Position this wire rack over a rimmed baking sheet. This ingenious setup allows any excess ganache to drip down neatly onto the baking sheet, making cleanup a breeze and ensuring the entire cake is beautifully coated without pooling around the bottom.
- The Pouring Technique: Slowly and evenly pour the warm ganache over the top of the cake. Start from the center and let it naturally flow outwards. You can gently tilt the wire rack to encourage the ganache to cover the entire top and sides of the cake. The goal is complete, even coverage for that truly professional look.
- The Finishing Touch: Once the ganache is poured, you can leave it as is for a minimalist, elegant look. If you desire extra flair, consider decorating with delicate candied violets, a sprinkle of edible gold leaf (gently crumbled over the center), or even a playful chocolate drizzle (perhaps with an optional peanut butter ganache swirl, as some enthusiasts swear by!).
- To Refrigerate or Not to Refrigerate? For the absolute shiniest, most mirror-like finish, serve your chocolate ganache cake immediately after the ganache has set slightly at room temperature. Refrigerating the cake will cause the ganache to set firmly and take on a more matte finish. While still absolutely delicious, the glossy sheen will be less pronounced. Choose based on your aesthetic preference and desired texture.
Elevating Your Chocolate Ganache Cake: Tips & Tricks for a Professional Touch
While the basic recipe yields a spectacular dessert, a few extra considerations can take your chocolate ganache cake from excellent to absolutely extraordinary.
- Ingredient Quality: Always opt for good quality chocolate chips or baking chocolate for your ganache. The flavor of your ganache is only as good as the chocolate you use. Similarly, full-fat heavy cream is essential for the right consistency and richness.
- Temperature Control: Pay close attention to the temperature of both your cake (cool) and your ganache (warm but not hot, pourable but not runny). This balance is crucial for smooth application and a beautiful set. If your ganache cools too much and thickens, gently reheat it over the double boiler until it reaches the desired pouring consistency.
- Double Layer Decadence: While this recipe focuses on a single-layer cake, don't hesitate to adapt it for a layered cake. Simply double the cake recipe, bake in two separate pans, and add a creamy chocolate filling between the layers before applying the ganache. This creates even more complex textures and an even more extravagant presentation.
- Storage Savvy: If you're not refrigerating, store your ganache cake in a cool, dry place covered loosely. It typically stays fresh and delicious at room temperature for 1-2 days. If refrigerated, allow it to come to room temperature for about 30 minutes before serving to ensure the ganache and cake are at their optimal texture and flavor.
There you have it – the comprehensive guide to creating a truly foolproof and elegant chocolate ganache cake. This dessert embodies luxury without the complexity, making it an accessible triumph for any home baker. The layers of rich chocolate flavor, the tender crumb of the cake, and the smooth, shimmering embrace of the ganache combine to create an experience that's nothing short of dreamy. So go ahead, don your apron, gather your ingredients, and prepare to delight yourself and everyone lucky enough to share a slice of this magnificent creation. Happy baking!
