The Allure of the Chocolate Ganache Cake: Your Dream Dessert Brought to Life
Imagine a dessert that epitomizes luxury, a treat so rich and visually stunning that it seems to have materialized straight from the window of a Parisian patisserie. This, dear reader, is the essence of a truly magnificent chocolate ganache cake. More than just a simple chocolate cake, this masterpiece features layers of intensely flavored chocolate cake enrobed in a glossy, velvety ganache, promising an experience that transcends mere sweetness. It's the kind of dessert that makes hearts flutter on Valentine's Day, elevates any celebration, and makes a regular Tuesday feel utterly extraordinary.
While its sophisticated appearance might suggest a challenging culinary endeavor, the beauty of a classic chocolate ganache cake lies in its surprising accessibility. You don't need a pastry degree to achieve bakery-quality results. With a few key techniques and a dash of passion, you can transform simple ingredients into a show-stopping dessert that will have friends and family convinced you’ve discovered a secret baker. Let's embark on a journey to create the ultimate dream dessert.
Crafting the Perfect Chocolate Cake Base
Every exceptional chocolate ganache cake begins with an equally exceptional cake base. This isn't just any chocolate cake; it needs to be moist, tender, and deeply flavorful to stand up to the richness of the ganache. The foundation sets the stage for decadence.
Essential Ingredients for a Rich Foundation
To create a cake that boasts both structure and an incredibly tender crumb, precise ingredient selection and measurement are paramount. Here's what you'll typically need:
- All-Purpose Flour: The backbone of the cake, providing structure.
- Granulated Sugar: Sweetens and tenderizes the cake, contributing to its moist texture.
- Unsweetened Baking Cocoa: The source of that intense chocolate flavor. High-quality cocoa makes a noticeable difference.
- Baking Soda: A leavening agent that helps the cake rise and contributes to its delicate texture, especially when paired with an acidic ingredient like cocoa.
- Unsalted Butter: Creamed with sugar, it creates air pockets for a light cake. Using unsalted butter allows you to control the total salt content.
- Eggs: Provide structure, richness, and moisture. Adding them one at a time ensures proper emulsification.
- Chocolate Syrup and/or Vanilla Extract: These amplify the chocolate flavor and add aromatic complexity. Don't skimp on good quality vanilla!
For an 8-inch round cake pan, ensure it's properly prepared – generously buttered and floured, with the bottom lined with parchment paper. This simple step prevents sticking and ensures an easy release.
Mixing and Baking for Optimal Texture
The method of mixing can drastically impact the final texture of your cake. Start by creaming the butter and sugar in the bowl of an electric mixer until the mixture is light, fluffy, and pale. This process incorporates air, essential for a tender cake. Next, beat in the eggs one at a time, allowing each to fully incorporate before adding the next. This creates a stable emulsion and prevents the batter from separating. Finally, gently mix in your chocolate syrup and vanilla.
When it comes to adding the dry ingredients (flour, cocoa, baking soda), the golden rule is: do not overbeat! Overmixing develops the gluten in the flour too much, resulting in a tough, chewy cake rather than a tender, crumbly one. Mix only until the ingredients are just combined and no streaks of flour remain.
Pour the batter into your prepared pan and bake at 325 degrees Fahrenheit for approximately 40 to 45 minutes. The key is to bake until the cake is just set in the middle; a toothpick inserted into the center should come out with moist crumbs, not wet batter. Crucially, do not overbake! An overbaked cake will be dry and crumbly, losing its decadent appeal. Once baked, allow the cake to cool thoroughly in the pan before attempting to remove it. Patience here prevents cracks and breakage.
Mastering the Art of Velvety Ganache
The ganache is arguably the star of the show for any chocolate ganache cake. This rich, glossy coating is what transforms a delicious chocolate cake into an elegant, show-stopping dessert. While it sounds fancy – it's French, after all – ganache is remarkably simple to prepare, making it a Foolproof Chocolate Ganache Cake: Elegant Dessert Made Easy even for novice bakers.
What is Ganache, Anyway? A Simple Explanation
At its heart, ganache is an emulsion of chocolate and cream. That's it! Traditionally, hot heavy cream is poured over chopped chocolate, allowed to sit, and then whisked until smooth and homogenous. The ratio of chocolate to cream dictates its consistency – more chocolate yields a thicker ganache (perfect for truffles or fillings), while more cream results in a pourable glaze. Sometimes, a touch of butter, sugar, or corn syrup is added for extra shine and smoothness. A popular secret ingredient, instant coffee, is often included not to make the ganache taste like coffee, but to dramatically enhance the deep, complex flavors of the chocolate itself.
The Foolproof Method for a Glossy Finish
Achieving that iconic, mirror-like sheen on your chocolate ganache cake involves a gentle approach to melting. The most foolproof way is to bring heavy cream (and any optional additions like instant coffee) to a simmer in a saucepan. Once simmering, immediately pour the hot cream over your chocolate chips or finely chopped chocolate, which should be placed in a heatproof bowl. Let it sit undisturbed for a minute or two – this allows the hot cream to gently melt the chocolate. Then, slowly whisk the mixture from the center outwards until it becomes a gorgeous, glossy, and perfectly smooth emulsion. While microwaving cream and chocolate in short intervals is possible, the gentle, controlled heat of the stovetop method guarantees a superior, shinier finish every time. For even more detailed tips on achieving that perfect shine, explore our guide on the Secrets to a Glossy Chocolate Ganache Cake Finish Every Time.
Assembling Your Masterpiece: Glazing and Decorating
The moment of truth arrives when your cooled cake meets your perfectly prepared ganache. This final stage is where your dream dessert truly comes to life.
Crucial Cooling and Setup for Glazing
Before even thinking about pouring ganache, ensure your cake is completely cool. This is not a suggestion; it's a critical rule. Pouring warm ganache over a warm cake will result in a runny, messy disaster, as the ganache will simply melt and slide off. Once cooled, invert the cake onto a wire rack. Place this wire rack over a rimmed baking sheet. This ingenious setup will catch any excess ganache, ensuring your countertop stays clean and allowing for a generous, even coating without unsightly pooling at the bottom of the cake.
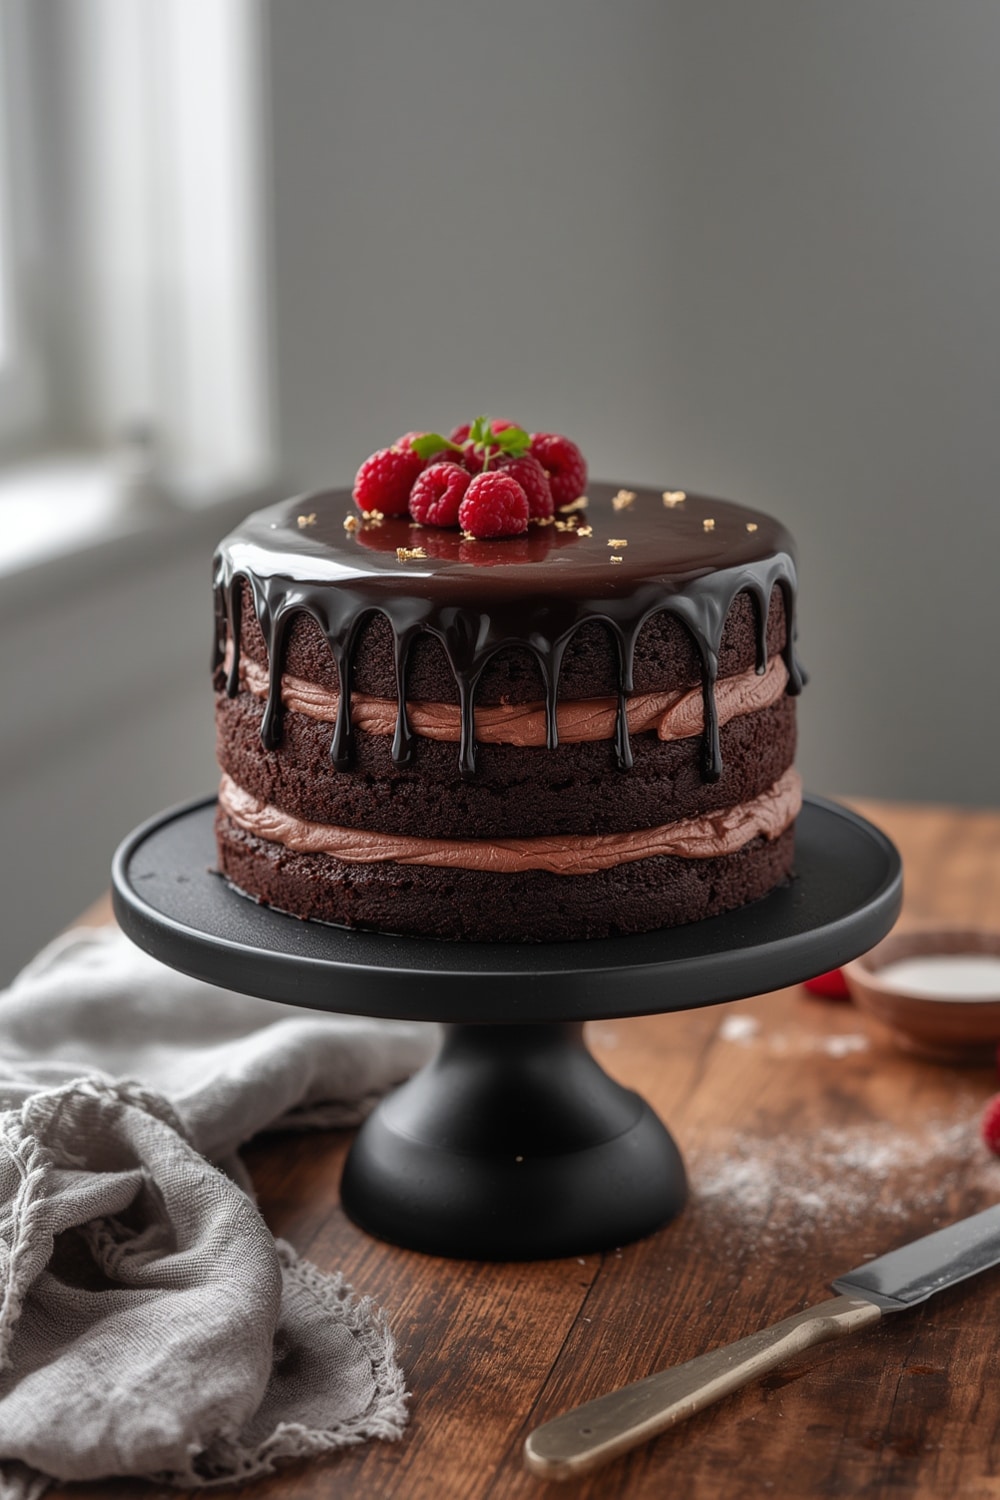
Pouring the Ganache for a Flawless Coat
With your cake perfectly positioned, it's time for the magic. Slowly and steadily pour the warm ganache evenly over the top center of the cake. Encourage the ganache to flow outwards and down the sides by gently tilting the wire rack. Continue pouring until the entire top and sides of the cake are covered in that irresistible, glossy glaze. Don't be shy; a thick, luscious layer of ganache is part of the appeal of a great chocolate ganache cake.
Your chocolate ganache cake will have the most breathtaking shine if served immediately after the ganache has just set. If you prefer a firmer, more matte finish, or need to transport the cake, you can refrigerate it to allow the ganache to fully set. Both options yield a delicious result, just with slightly different aesthetic appeal.
Elevating with Elegant Garnishes
While the ganache itself is often decoration enough, adding a few thoughtful touches can elevate your chocolate ganache cake from stunning to truly unforgettable. Consider these elegant options:
- Candied Violets: A classic, delicate touch for a sophisticated presentation.
- Gold Leaf: Gently crumbled and placed on the center, it adds an instant touch of luxury.
- Chocolate Shavings or Curls: Easy to make with a vegetable peeler and a bar of chocolate.
- Fresh Berries: Raspberries or strawberries offer a beautiful color contrast and a hint of tartness.
- Dusting of Cocoa Powder: A simple, rustic, yet elegant finish.
- Peanut Butter Ganache Swirl: For an extra layer of flavor and visual intrigue, swirl in a secondary ganache. Once you try it, it might become mandatory!
Do not refrigerate your ganache cake if you desire that ultimate glossy finish, as the cold can dull the shine. Store it at cool room temperature, covered loosely, for optimal presentation and texture.
Conclusion
The chocolate ganache cake stands as a testament to the power of simple ingredients transformed by mindful technique into an extraordinary dessert. From the tender crumb of the rich chocolate cake to the luxurious, glossy embrace of the ganache, every element works in harmony to create a truly decadent experience. It’s a dream dessert that’s not just for special occasions but for any moment you wish to infuse with a touch of magic. Embrace the process, savor the aroma, and delight in the joyous reward of creating a masterpiece that will be remembered long after the last crumb is gone.
